


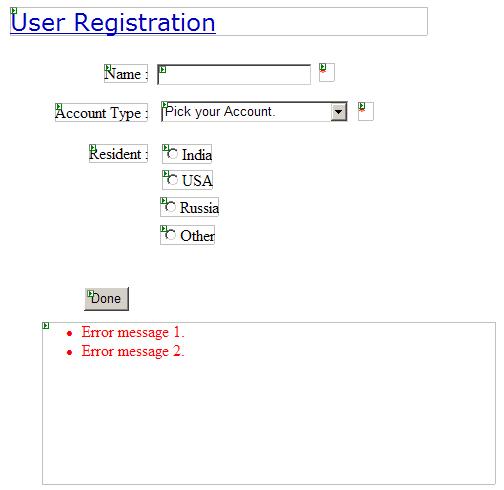
This article explains the validation control and how to use server side controls. We will create a simple ASP .Net page to create a user account creation page. A screen shot of the form design is shown below:
How it Works
The user must enter his or her name in the first textbox. Then using the combobox the account type should be selected. Then the resident country combobox is used to specify the country. If name and account type is not specified, the form should report it so that user should make the correction. When account type selected is Forever the other country radio button should be hidden.
Designing the Form
To know how the form is designed you can download a screen-cam video from here. It is recorded when I am making the form ready for coding. Alternatively, you can go through this section to start the design.
1) As you see, the controls are not in the default layout. If you have already placed two or more controls you are aware that the default is flow layout. To make it appear like the screen shot above, change the layout to absolute position. To do that click on Layout|Position|Auto Position Option.
2) From the dialog displayed, select the Absolutely positioned option from the combo box.
3) After this, place four Labels, one text box, one Dropdownlist, 4 Radio buttons and one push button control on the form. Place it as shown in the above screen shot.
4) Place required field validation control next to the Name text box.
5) Place the Compare validation control next to the Drop Down List control.
6) Place validation summary at the end of the form.
To Set the Properties: Open the attached website for your reference, select each control and set the Property values that appears in bold for your web form. Or if you already downloaded the video you can sit back and watch it. I will explain some important properties below:
Account Type Dropdown: The items are added using the items collection. Then the Auto-Post back property is set to false. If you note down, the How it works in the introduction section tells you that a radio button visibility is set to false when the last account type is selected. So the auto post back will send all the form information back to the web server when the selection in the combo box is changed.
Resident Radio button: For all the radio buttons, Group Name is set to grpResident. This allows all the four radio buttons in one group.
Required field: If you remember this control is placed next to the Name text box. The control to Validate property tells, which control needs to be validated by this validation control. In our example text box is selected for this property. Error Message property specifies, what error message should be displayed when the validation control reports a failure. However, this error text will be displayed on the Validation summary control. The text property tells what needs to be displayed in the validation control itself when the validation fails. Error message is set to: Name is a required field. Do not leave it Empty. And textproperty is set to: *
In our example when the done button is clicked leaving the text box empty, an asterisk is displayed next to the text box and error message set to this control is displayed in the validation summary control added at the end of the form.
Compare Field: This validation control, as the name states, compares a value and reports success or failure about it. In our example if you do not make any selection, the error is shown in the validation summary control displayed at the end of the form. In the reference application have a look to the bold property values for this control. The following is the explanation:
We do specify to this what needs to be compared. So Pick your Account. string is specified to the ValuetoCompare property. Then as the type property is already a string we need to do nothing. Set the Operator to Not Equal. The other property I hope you can understand since you have already done it for therequired field validation control. Now, when you change the selection, the Not Equal comparison is performed against the constant string Pick your Account.
READ MORE >>


0 comments:
Post a Comment