


When we don't want to use Windows Credentials to validate a user, we can utilize the ASP.NET infrastructure to implement our own authentication infrastructure which includes a custom login page that validates a user against credentials such as a database and later established security context on each request. ASP.NET leverages it's framework to support cookies and establishes the security context for each web request; this is called form authentication.
Points to remember:
Why to choose Form authentication:
How to implement Form Authentication:
Step 1: Configure forms authentication in the web.config file:
The following is the default that Visual Studio provides; change it to form authentication.
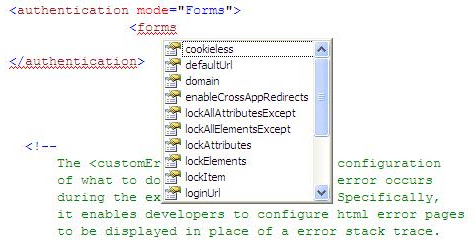
<authentication mode="Windows" /> <!-- The <customErrors> section enables configuration
of what to do if/when an unhandled error occurs
during the execution of a request. Specifically,
it enables developers to configure html error pages
to be displayed in place of a error stack trace.
Change it to form:
<authentication mode="Forms">
We have many attributes for configuring form authentication such as below:
For this example, we will keep it simple as in the following:
<authentication mode="Forms"> <forms name="MyCookieName" timeout="20" loginUrl="dbLogin.aspx"> <credentials passwordFormat="SHA1"> <user name="vishal" password="123"/> <user name="nayan" password="321"/> </credentials>
</forms>
</authentication>
Notice here that we are storing credentials in the web config file itself. We can store them anywhere we wish to, including a database.
<credentials passwordFormat="SHA1"> <user name="vishal" password="123"/> <user name="nayan" password="321"/> </credentials>
Step 2: Next we have to deny anonymous user:
<authorization >
<deny users="?"/> </authorization>
The question mark (?) is a wildcard character that matches all anonymous users. By including
this rule in your web.config file, you specify that anonymous users are not allowed. They all should be authenticated.
Step 3: Now we have to create custom login page which takes user username and password credential and validate them against credential store which is web.config file.
The HTML for this is as below:
<asp:Panel ID="MainPanel" runat="server" Width="380px" BorderColor="Silver" BorderStyle="Solid" BorderWidth="1px">
Points to remember:
- Form authentication follows a ticket system in which a user gets an Authentication Ticket at the time of login with other basic information attached to it. This is accomplished by assigning an authentication ticket in a cookie to the client which is also called "cookie authentication".
- When a request comes from an anonymous user for a web page, ASP.NET checks for this ticket, when it is not found, the request is redirected to a login page.
- When ASP.NET detects the authentication ticket, and the user is validated, then the runtime automatically sets an authentication cookie, which will contain an authentication ticket and then redirect the user to a requested page. This is accomplishing by calling the FormAuthentication class method.
Why to choose Form authentication:
- You have full control over the authentication code.
- You have full control over the appearance of the login form.
- It works with any browser.
- It allows you to decide how to store user information.
How to implement Form Authentication:
Step 1: Configure forms authentication in the web.config file:
The following is the default that Visual Studio provides; change it to form authentication.
<authentication mode="Windows" /> <!-- The <customErrors> section enables configuration
of what to do if/when an unhandled error occurs
during the execution of a request. Specifically,
it enables developers to configure html error pages
to be displayed in place of a error stack trace.
Change it to form:
<authentication mode="Forms">
We have many attributes for configuring form authentication such as below:
For this example, we will keep it simple as in the following:
<authentication mode="Forms"> <forms name="MyCookieName" timeout="20" loginUrl="dbLogin.aspx"> <credentials passwordFormat="SHA1"> <user name="vishal" password="123"/> <user name="nayan" password="321"/> </credentials>
</forms>
</authentication>
Notice here that we are storing credentials in the web config file itself. We can store them anywhere we wish to, including a database.
<credentials passwordFormat="SHA1"> <user name="vishal" password="123"/> <user name="nayan" password="321"/> </credentials>
Step 2: Next we have to deny anonymous user:
<authorization >
<deny users="?"/> </authorization>
The question mark (?) is a wildcard character that matches all anonymous users. By including
this rule in your web.config file, you specify that anonymous users are not allowed. They all should be authenticated.
Step 3: Now we have to create custom login page which takes user username and password credential and validate them against credential store which is web.config file.
The HTML for this is as below:
<asp:Panel ID="MainPanel" runat="server" Width="380px" BorderColor="Silver" BorderStyle="Solid" BorderWidth="1px">
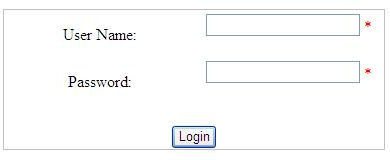
<table> <tr> <td width="30%" style="height: 43px"> User Name:</td> <td width="30%" style="height: 43px"> <asp:TextBox ID="UsernameText" runat="server" Width="80%"> </asp:TextBox> <asp:RequiredFieldValidator ID="UsernameRequiredValidator" ControlToValidate="UsernameText" ErrorMessage="*" runat="server"> </asp:RequiredFieldValidator> <asp:RegularExpressionValidator ID="UsernameValidator" runat="server" ControlToValidate="UsernameText" ValidationExpression="[\w| ] *" ErrorMessage="Invalid Username"> </asp:RegularExpressionValidator> </td> </tr> <tr> <td width="30%" style="height: 26px"> Password:</td> <td width="30%" style="height: 43px"> <asp:TextBox id="PasswordText" runat="server" TextMode=Password Width="80%"></asp:TextBox> <asp:RequiredFieldValidator id="PwdRequiredValidator" ErrorMessage="*" runat="server" ControlToValidate="PasswordText"></asp:RequiredFieldValidator> <asp:RegularExpressionValidator ID="PwdValidator" ControlToValidate="PasswordText" runat="server" ErrorMessage="Invalid Password" ValidationExpression='[\w| !"§$%&/()=\-?\*]*'> </asp:RegularExpressionValidator> </td> </tr> </table> <br /> <asp:Button ID="LoginAction" runat="server" Text="Login" /><br /> <asp:Label ID="LegendStatus" runat="server" EnableViewState="false" Text="" /></asp:Panel> </asp:Panel>
You see here we have used a Validation control for each of username and password textbox.
Username: ValidationExpression="[\w| ] *"
It may contain letters, digits, and spaces only. Therefore, the validation expression looks like this:
Password: ValidationExpression='[\w| !"§$%&/()=\-?\*]*'>
To support special characters only
READ MORE>>


0 comments:
Post a Comment