Silverlight is a new and powerful browser plug-in that works with Mac OS, Windows and Linux. It helps you create rich web application that is safe, secure and scalable cross-platform. This article will use Visual Studio 2008 to create Silverlight pop search form control.
System Requirement
Design Requirement
The main control is combining with two textboxes and one button as Fig 1. The first textbox has ability to display data and enter data. The button will show up pop search form. The second textbox has ability to display data only.

Fig 1. Main Control with function descriptions
The pop search form control has datagrid to display data and it has searching function as Fig 2.
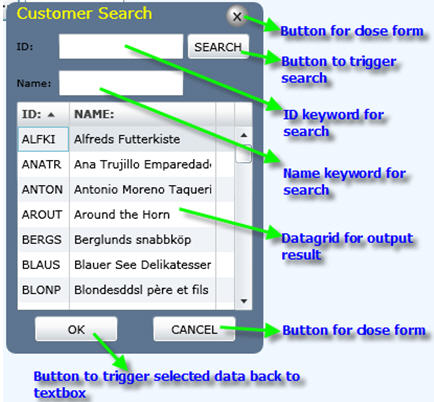
Fig 2. Pop Search Form control with function descriptions
There are two ways to bring data from datagrid to the main control.
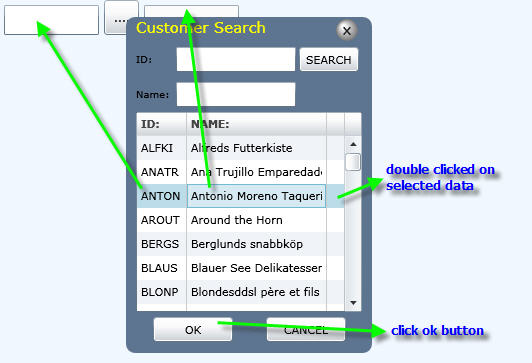
Fig 3. Bring selected data back to Main control
There is one way to extract data without pop search form.
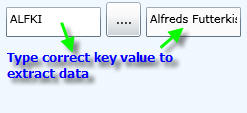
Fig 4. Types correct ID to display Name
Create Silverlight and WCF Project
Once we know control's functionalities, now we can start to create our project in Visual Studio 2008. Let's create all the projects we need, then we will tackle each project to achieve goal.
**Please download the code and walkthrough it with each step
Step 1. Create Silverlight Application
In Visual Studio 2008, go File->New->Project then select Sivlerlight Application. You can name whatever name you would like to call. I will name it popFormDemo in this sample as Fig 5.
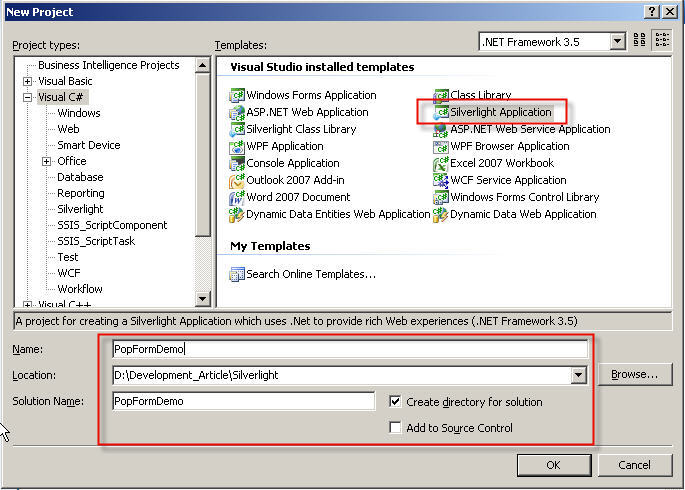
Fig 5. Create Silverlight project
You should see the wizard window after you click OK in step 1. We will leave it in default setting as Fig 6.
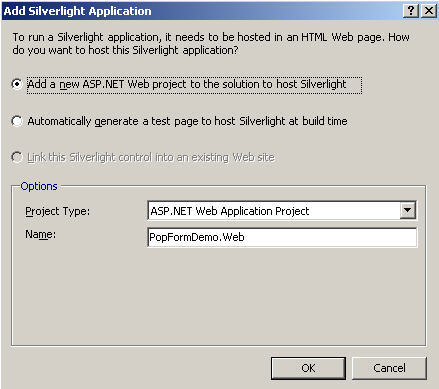
Fig 6. Add Silverlight Application wizard
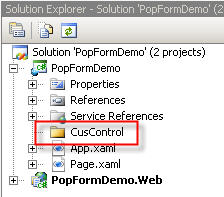
Add New Folder under PopFormDemo Project with name CusControl as Fig 7.
System Requirement
- This application requires the user to have copy of Visual Studio 2008
- Microsoft Silverlight 2 Tools for Visual Studio 2008 SP1 (http://www.microsoft.com/downloads/details.aspx?FamilyId=c22d6a7b-546f-4407-8ef6-d60c8ee221ed&displaylang=en)
- Northwind database in MS SQL Server
Design Requirement
The main control is combining with two textboxes and one button as Fig 1. The first textbox has ability to display data and enter data. The button will show up pop search form. The second textbox has ability to display data only.

Fig 1. Main Control with function descriptions
The pop search form control has datagrid to display data and it has searching function as Fig 2.

Fig 2. Pop Search Form control with function descriptions
There are two ways to bring data from datagrid to the main control.
- By double click datagrid
- By click OK button

Fig 3. Bring selected data back to Main control
There is one way to extract data without pop search form.
- Types correct ID (key) in first textbox to display Name (Value) data.

Fig 4. Types correct ID to display Name
Create Silverlight and WCF Project
Once we know control's functionalities, now we can start to create our project in Visual Studio 2008. Let's create all the projects we need, then we will tackle each project to achieve goal.
**Please download the code and walkthrough it with each step
Step 1. Create Silverlight Application
In Visual Studio 2008, go File->New->Project then select Sivlerlight Application. You can name whatever name you would like to call. I will name it popFormDemo in this sample as Fig 5.

Fig 5. Create Silverlight project
You should see the wizard window after you click OK in step 1. We will leave it in default setting as Fig 6.

Fig 6. Add Silverlight Application wizard
Add New Folder under PopFormDemo Project with name CusControl as Fig 7.

Fig 7. Create new folder in PopFormDemo project
Under CusControl Folder, add New Silverlight user control with name PopForm as Fig 8.
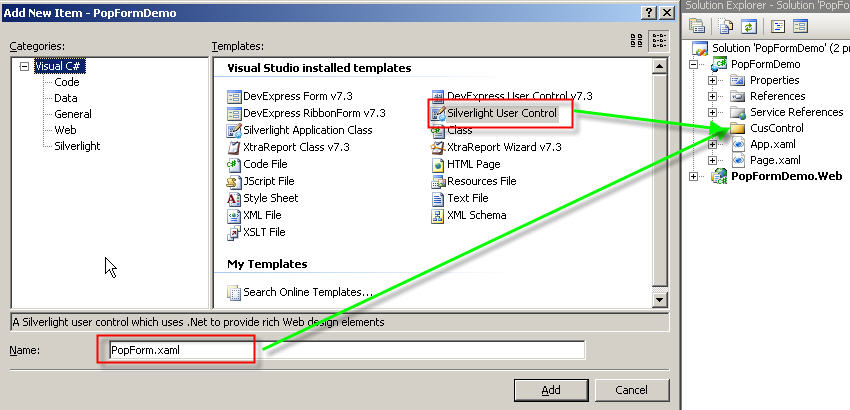
Fig 8. Add new Silverlight User Control in CusControl folder
Under CusControl Folder, add New Silverlight user control with name PopForm as Fig 8.

Fig 8. Add new Silverlight User Control in CusControl folder


0 comments:
Post a Comment