


Using videos in a Silverlight based application is a very exciting feature that come early Silverlight 2. Today we see the most extended Silverlight specially Microsoft added GPU Hardware Acceleration for video and bitmap in Silverlight 3 and now Silverlight 4 supports the output protection for video and audio.
How to Play Video
To play the video, we can simply drag the compatible [List of Supported Media Formats] video file on the development stage. Now, if you add videos in the development stage and test it, then it will have the following three annoying work:
- Movie will automatically start
- Movie runs untill the end and when reaches at end can't run again
- Once movie starts there is no way to stop or pause this
But by using some coding in code-behind we can control the playback of movie. Let's see how!
1. Dealing with Automatic Start
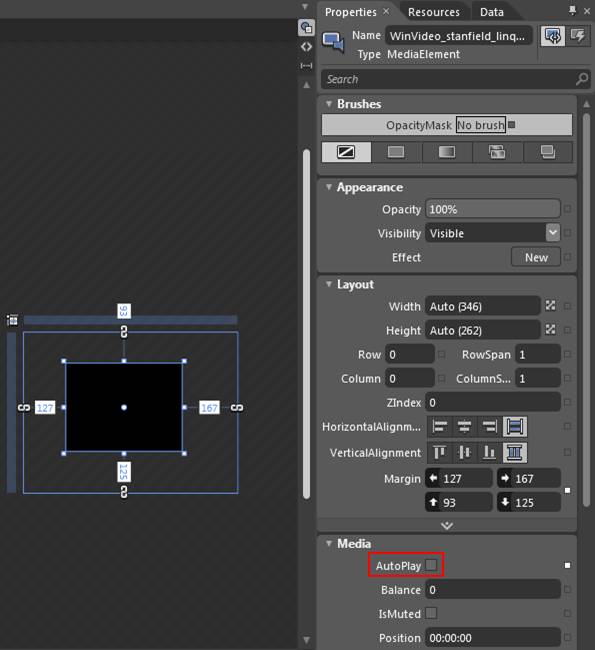
By default videos automaticall get started when we run the project, it is distracting feature from the users point of view. To change auto start false, select the video on stage and in properties uncheck the 'AutoPlay' option.
2. Dealing with Endless Playback
By default, when the video reaches the end then it stops and does not start again. To change such a setting follow the steps:
- Select the video on stage
- In Properties, switch the mode from 'Properties' to 'Events'.
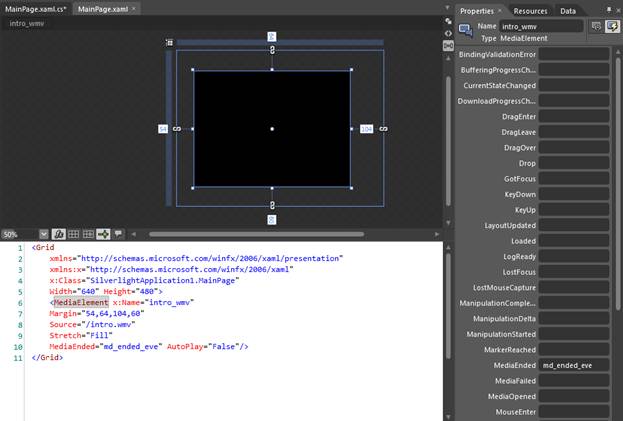
- In the Event list, point to 'MediaEnded' label and type the event handler name (I will be using md_ended_eve) and then press tab to apply it and it automatically switches you to code-behind with a new event.
- Now type the following code inside event handler.
(intro_wmv).Stop();
(intro_wmv).Play();
In above code 'intro_wmv' is my media fine name.
- Now test the application.
Note to use 'AutoPlay' to true when you are testing endless loop.
XAML Code
<Grid
xmlns="http://schemas.microsoft.com/winfx/2006/xaml/presentation"
xmlns:x="http://schemas.microsoft.com/winfx/2006/xaml"
x:Class="SilverlightApplication1.MainPage"
Width="640" Height="480">
<MediaElement x:Name="intro_wmv"
Margin="54,64,104,60"
Source="/intro.wmv"
Stretch="Fill"
MediaEnded="md_ended_eve" AutoPlay="False"/>
</Grid>
XAML.CS Code
using System;using System.Windows;using System.Windows.Controls;using System.Windows.Documents;using System.Windows.Ink;using System.Windows.Input;using System.Windows.Media;using System.Windows.Media.Animation;using System.Windows.Shapes;
namespace SilverlightApplication1
{
public partial class MainPage : Grid
{
public MainPage()
{
// Required to initialize variables InitializeComponent();
}
private void md_ended_eve(object sender, System.Windows.RoutedEventArgs e)
{
// TODO: Add event handler implementation here. (intro_wmv).Stop();
(intro_wmv).Play();
}
}}
3. Control Video Playback by Pause and Play
By default in Silverlight video plays and we can't control it by pausing and playing. But by writing some lines in code-behind we can control this playback. For this we have to create the event as we saw in above example. Let's follow the steps:
- Open the event explorer by switching the property (look above image).
- Type the event name in 'MouseLeftButtonDown', I will be using here 'pause_start_evn' and press tab to switch in event handler mode.
- In the appeared event type the following code:
private bool IsPaused=true;
private void pause_start_evn(object sender, System.Windows.Input.MouseButtonEventArgs e)
{
// TODO: Add event handler implementation here.
if(IsPaused)
{
(intro_wmv as MediaElement).Play();
IsPaused=false;
}
else
{
(intro_wmv as MediaElement).Pause();
IsPaused=true;
}
}
In the above code, 'intro_wmv' is my media file name.
- Now test the application and check by right mouse click on video surface.
READ MORE>>


0 comments:
Post a Comment